近期需要实现项目的 docker 部署,服务器中已实现 docker 环境,本文记录如何在服务器上用容器部署 vue3 项目。
docker 环境准备
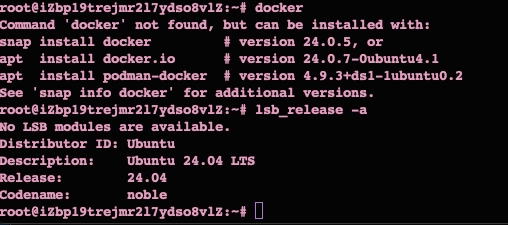
给了一台全新阿里云机器,里面没有docker环境,需要安装。机器环境如下:

同事建议安装 docker-ce,安装命令如下:
| apt-get install docker-ce
apt install docker-ce
|
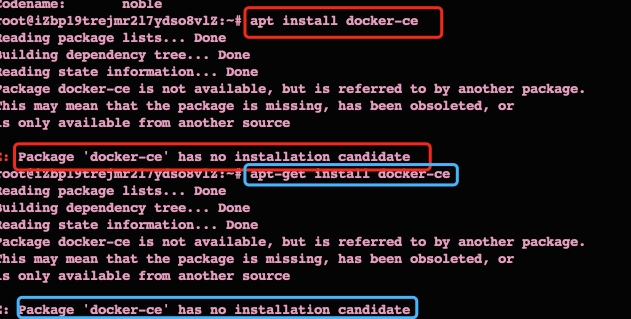
但是发现有这样的报错:

原因是源里面没有docker-ce的包,需要添加源:
| sudo add-apt-repository "deb [arch=amd64] https://mirrors.aliyun.com/docker-ce/linux/ubuntu $(lsb_release -cs) stable"
|
这时又出现了这个报错:

原因是没有证书,需要导入证书:
| curl -fsSL https://download.docker.com/linux/ubuntu/gpg | sudo gpg --dearmor -o /usr/share/keyrings/docker-archive-keyring.gpg
|
结果又报错gpg: no valid OpenPGP data found.,整个大无语了。。。
docker 环境安装全指令
重启机器,再次从头安装,命令如下:
1
2
3
4
5
6
7
8
9
10
11
12
13
14
15
16
17
18
19
20
21
22
23
| sudo apt-get update
# 安装让 APT 可以通过 HTTPS 使用存储库(repository)的包
sudo apt-get install \
apt-transport-https \
ca-certificates \
curl \
gnupg \
lsb-release
# 添加Docker的官方GPG密钥:
curl -fsSL https://download.docker.com/linux/ubuntu/gpg | sudo gpg --dearmor -o /usr/share/keyrings/docker-archive-keyring.gpg
# 使用下面的命令设置稳定的仓库:
echo \
"deb [arch=amd64 signed-by=/usr/share/keyrings/docker-archive-keyring.gpg] https://download.docker.com/linux/ubuntu \
$(lsb_release -cs) stable" | sudo tee /etc/apt/sources.list.d/docker.list > /dev/null
# 再次更新包索引:
sudo apt-get update
# 安装Docker CE:
sudo apt-get install docker-ce docker-ce-cli containerd.io
|
部署指令
- 个人根目录下应有三个文件,项目打包文件
dist、nginx.conf、Dockerfile。
1.1 创建 nginx.conf 文件,主要用于配置端口号和请求转发地址,若以微前端方式部署,需要添加允许跨域配置,内容如下:
1
2
3
4
5
6
7
8
9
10
11
12
13
14
15
16
17
18
19
20
21
22
23
24
25
26
27
28
29
30
31
32
33
34
35
36
37
38
39
40
41
42
43
44
45
46
47
48
49
50
51
52
53
54
55
56
| user nginx;
worker_processes auto;
error_log /var/log/nginx/error.log warn;
pid /var/run/nginx.pid;
events {
worker_connections 1024;
}
http {
include /etc/nginx/mime.types;
default_type application/octet-stream;
log_format main '$remote_addr - $remote_user [$time_local] "$request" '
'$status $body_bytes_sent "$http_referer" '
'"$http_user_agent" "$http_x_forwarded_for"';
access_log /var/log/nginx/access.log main;
sendfile on;
#tcp_nopush on;
keepalive_timeout 65;
#gzip on;
include /etc/nginx/conf.d/*.conf;
server {
listen 51999;
listen [::]:51999;
server_name localhost;
location / {
add_header 'Access-Control-Allow-Origin' '*';
add_header 'Access-Control-Allow-Methods' 'GET, POST, OPTIONS';
add_header 'Access-Control-Allow-Headers' 'Origin, Authorization, Content-Type, Accept, X-Requested-With';
if ($request_method = 'OPTIONS') {
add_header 'Access-Control-Allow-Origin' '*';
add_header 'Access-Control-Allow-Methods' 'GET, POST, OPTIONS';
add_header 'Access-Control-Allow-Headers' 'Origin, Authorization, Content-Type, Accept, X-Requested-With';
return 204;
}
root /usr/share/nginx/html;
index index.html;
try_files $uri $uri /index.html;
}
error_page 500 502 503 504 /50x.html;
location = /50x.html {
root /usr/share/nginx/html;
}
location /v1/ {
proxy_pass http://***:31333/v1/;
}
}
}
|
1.2 项目根目录下创建 Dockerfile 文件,内容如下:
| FROM nginx:1.25.5-alpine
COPY dist /usr/share/nginx/html
COPY nginx.conf /etc/nginx/nginx.conf
EXPOSE 51888
CMD ["nginx", "-g", "daemon off;"]
|
注意 EXPOSE 端口号和 nginx listen 端口号一致。
若有多个项目,可以创建多个 Dockerfile 文件,在项目根目录下启动就行。
本机已配置好 nginx:1.25.5-alpine 镜像,可以直接使用。若查找不到本地镜像,docker 会从官方拉取镜像,这里就涉及到是否能访问到外网,以及能否设置代理获取到国内镜像,设置起来有点麻烦。
- 个人根目录下
2.1 创建镜像
| # 项目名:tag
docker build --no-cache -f dockerfile -t ai-sys:20241017-1 .
docker build --no-cache -f dockerfile -t ai-controller:20241017-1 .
|
2.2 运行容器
| # 查看镜像
docker images
# -d: 后台运行容器并返回容器 ID
# -p: 端口映射 外部访问端口:内部容器端口
docker run -d -p 51888:51888 imageID/imageName
docker run -d -p 51999:51999 imageID/imageName
|
访问项目
浏览器访问 http://ip:51888/
修改文件后重启
删除容器时,容器必须是停止状态,否则删除失败。
| # 查看正在运行的容器
docker ps
docker kill containerID
docker rm containerID
docker rmi imageID
|
附录
深入理解Docker:docker、podman-docker、docker.io和docker-ce的区别


